Monday, June 4, 2012

OAF Error: The search cannot be executed because the table has pending changes that would be lost.


If you are getting the above error message while trying to Query a Region in OAF. Add the below simple code in the Controller of the Region/Page after you call the AMMethod.

OAF Error Message:
"The search cannot be executed because the table has pending changes that would be lost"

OAAdvancedTableBean table = (OAAdvancedTableBean) webBean.findChildRecursive ("CustomersAdvTable");
        // When handling a user initiated search, we always need to execute
        // the query so we pass "false" to queryData().
  table.queryData(pageContext, false);

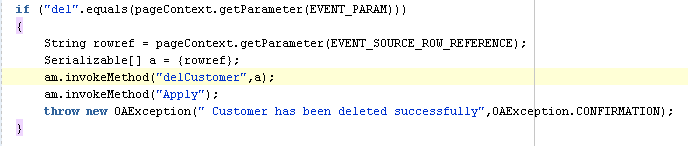
Check the below screenshot to check how I used the above code.

Source: Jaiswal Neelmani
http://jneelmani.blogspot.com/2009/11/oaf-search-cannot-be-executed-because.html

Monday, May 28, 2012

How to create a Result Type in a Notification

To display a new Result Type in the notification we need to create a new Lookup Type in the workflow builder and Lookup Codes that you want to display in the notifications.
Steps to Create a New Lookup Type and Assign it to a Notification
1. Right Click on Lookup Types -- Select New
   

2. New Lookup Type will be displayed under the Lookup Types 
     
3. Right Click on the New BPA Approval Lookup that we created and Select “New Lookup Code”
    
4. Enter the following Properties for the New Lookup Code and Click Apply and OK
     
5. Create a new Lookup Code for “Reject” similarly as did for “Approve”
      
 
6. To be able to see these Lookup Codes as buttons in the Approval Notification, Create a New Message with the Result Type as BPA Approval Lookup
7. Create a new Message and in the Result Tab, Enter the following Properties as shown below.
     
 
8. Click Apply and OK.
9. Now assign this Message and Result Type to the Notification where you want to have this Results Displayed as Buttons inside the Notification
   
10. Include this Notification in your Process and when Run, you would be able to see the selected Resulted type of Buttons in the Notification
    

Friday, May 25, 2012

Delete Icon Next to a Row in Advanced Table

Delete Icon will be used to delete a row in the Advanced Table. An Icon can be handled in the Table after all the columns and when Clicked upon this Icon, would delete the entire row from the Table and DB. To achieve this functionality, we need to perform the following steps.
1. Create an Advanced Table and All your Columns required in that Table.
2. To be able to display the Delete Icon at the end, Right Click on the Advanced Table --> New --> Column
3. Right Click on the New Column created and Select --> New --> Item
    Set the following properties to this Item..

4. Right Click on Column Components --> Select Sortable Header 
5. Click on Sortable Header and in the Properties set the Prompt as "Delete".
Now we have the Front End Icon is ready. If you run the Page, You will be able to see the Icon in the End of the Columns of the Table. Now we need to Handle this Event in back end to delete the row next to the Delete Icon pressed.

6. Write the following code in the ProcessFormRequest method of the Page Controller.
7. Include the following code in the AMImpl,java file of the Attached AM.

Rebuild the project and Run the Page. You should be able to delete the Row When Clicked on the Delete Icon next to that row.                                                    


Wednesday, February 29, 2012

How to create a poplist item in OAF

To create a poplist item, you need a VO which would display the values in the poplist. Lets say we want to display a poplist which would display the values "Yes", "No" in the poplist.

  • Create a VO which would bring these values from the FND_LOOKUP_VALUES
    Path: xxeee.oracle.apps.ak.test.poplist.server.EnabledFlagVO
    Add this new VO to the main AM

                                           
  • To use this VO, Create a new item in the Main Page with the Item Style as "MessageChoice"
  • Item Id: EnabledFlag
  • Select the appropriate data type
    Picklist View Instance:.EnabledFlagVO1 (This is the instance which populates the values in the
                                            poplist.
    Picklist Display Attribute: Meaning (This is the attribute from Poplist VO which would display
                                                the value in poplist
    Picklist Value Attribute: Code (This is the attribute value you would like to save in the database for
                                              for the main page)
    View Instance: This is the view instance of the Main Page from poplist item is being used.
    View Attribute: This is the attribute which would hold the value we chose from the poplist.
  • If you want to have a blank value displayed in the poplist, Set the "Add Blank Value" in the item properties to True.
  • If you want to display a specific value initially in the poplist when page is rendered.
    Set that value attribute in the "Initial Value" property.


Tuesday, February 28, 2012

How to create a external Lov region for Lov Input in OAF

Lets say you want to create a Lov Input for the Item "State" which would be used to select the states in USA while entering the Address.
For this first you would need a VO which would get all the States for USA.

  • Create a VO with the Select statement which gets all the USA States from the lookup
    Path: xxeee.oracle.apps.ak.test.lov.server
  • Create a new AM to attach the above created VO and then Attach the VO to the AM as shown below (Path: xxeee.oracle.apps.ak.test.lov.server.StatesAM)
    To attach the VO to AM: Select the StatesVO on the Left Side (Available View Objects) and Click on the Arrow as show below to move it to the Data Model side. This will create a new View Instance StatesVO1 of the parent object StatesVO. From here on we will be using this new instance which is attached to the AM not the Parent VO (StatesVO).

  • Now we have the VO to get the LOV Details is ready and AM to hold that VO is ready. Then we need an Independent Region which would be used to display the details for this LOV and Controller for that Region. To Create a new Region, Right Click on the Package and Select "New"
  • OA Components --> Region (Path: xxeee.oracle.apps.ak.test.lov.webui)
  • Give the following properties to the Header Region (Top Region)
     1) Region Style: listofvalues
     2) AM Definition: xxeee.oracle.apps.ak.test.lov.webui
    Leave the other details to default  values
  • Right Click on the StatesRN and Navigate New --> New Region
    Assign the following properties to the New Child Region
     1) ID: MainRN
     2) Region Style: table
    Leave all other details to default.
  • Right Click on the MainRN and Navigate to Create 2 new items with the following properties
    Item 1:
     
    1) ID: StateCode
     2) Item Style: MessageStyledText
     3) Search Allowed: True
     4) Sort Allowed: True
     5) Datatype: VARCHAR2
     6) View Instance: StatesVO1
     7) View Attribute: LookupCode
     8) Prompt: State Code
    Leave all other values to default.
    *****************************
    Item 2:
     
    1) ID: State
     2) Item Style: MessageStyledText
     3) Search Allowed: False
     4) Sort Allowed: True
     5) Datatype: VARCHAR2
     6) View Instance: StatesVO1
     7) View Attribute: Meaning
     8) Prompt: State
    Leave all other values to default.
  • Two important properties in the above Region Items
    1. Search Allowed: For the Item when this Property value is set to True, In the LOV region when opened, User will be able to Search based on the Item.Let's say we have set the property to True for item "StateCode". So when the LOV Region is opened, we will be allowed to search based on the State Code as show below
                                 
    Because we haven't set the Search Allowed Property to True for Item "State", it is not showing up in the Search By Poplist.
    2. Sort Allowed: Sort Allowed Property will let the user sort the data by selected Column whose "Sort Allowed" property is set to True
  • Now our Region is Ready. Next Right Click on the Top Region and Select "Set New Controller"
    Path: xxeee.oracle.apps.ak.test.lov.webui.StatesLovCO

    In the ProcessRequest Method of the Controler Include the following code as shown below, So that query is executed and data is populated in the LOV Region when clicked upon.
  • Create a new item in main of the page in which you want to see the LOV region.Set the item style to MessageLovInput. As soon as you change the item style, you will see a new region under the Lov item. Also you will find a lovMappings item created along with the region.You can delete the new region created by Lov as we would be using the External Region to display Lov values.
    Set the following properties as shown below for the Lov Item.

  • To use the External Lov region populate the External Lov field with the Region that was created previously (Complete Path). Set the Sort Allowed propety to "No"
  • Click on the lovMap1 created under LovMappings. Set the appropriate id for the lovMap1.
    Following properties are important for this lov to work.
    LovRegionItem: This is the value that you want to store in the database or use from the Lov region.
    ReturnItem: Give the Item ID from the current region where you want to have the value from the
                          Lov stored.
    CriteriaItem: Give the same value as ReturnItem.

  • Rebuild the page and run the page to have the Lov displayed next to the "State" Item in the page