Following are the binding styles that can be used in the OAF screens.
Oracle Positional: This style represents parameters as colons followed by numbers, as in the following code fragment:WHERE bar = :1 AND foo = :2 In this style, the numbers are just for easier readability: Parameters are passed into the view object in the order in which the numbers occur. The above fragment, for example, is equivalent to WHERE bar = :70 AND foo = :3
Oracle Named: This style represents parameters as colons followed by identifiers, as in the following code fragment:WHERE bar = :barparam AND foo = :fooparam Unlike the positional styles, the names of the parameters are actually used when the application fills the parameter values
JDBC Positional: This style represents parameters as question marks, as in the following code fragment:WHERE foo = ? AND bar = ?. This should be used only if you are working with non-oracle database.
Showing posts with label OAF. Show all posts
Showing posts with label OAF. Show all posts
Wednesday, June 12, 2019
Monday, February 17, 2014
Error "Each row in the Query Result Columns must be mapped to a unique Query Attribute in Mapped Entity columns" while extending a VO
I was trying to extend the seeded iProcurement VO “ReqsApprovalsVO” with out adding any custom attributes.


I went back to the seeded VO to see if any of the attributes are having this issue. Right Click on “ReqsApprovalsVO” à Edit ReqsApprovalsVO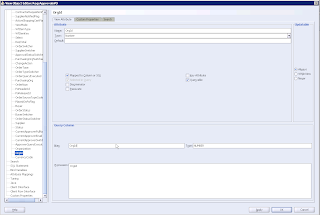


When I clicked “Next” button on the Step 4/7 (Attribute Mappings), I hit this roadblock which keeps saying “Each row in the Query Result Columns must be mapped to a unique Query Attribute in Mapped Entity columns” and does not let me extend the VO after this.

I thought of several reasons which could be causing this error. I thought it had something do with the file version of the seeded VO I am trying to extend or it could be due to the jDeveloper version I am using.
I ruled out all the possibilities one by one including the jDeveloper issues. Then I looked in metalink and one of the notes gave me a little clue which would solve my issue.

Source: Metalink Note: 1524622.1
I went back to the seeded VO to see if any of the attributes are having this issue. Right Click on “ReqsApprovalsVO” à Edit ReqsApprovalsVO
I found this attribute OrgId which is “Mapped to Column or SQL” and has the Query column as “OrgId”

When I verified the SQL Statement for this VO, OrgId attribute has been pulled as “Org_Id” in the query which is not same as “OrgId” and this explains me why the error has been occurring when I am trying to extend the VO.

To resolve the issue, I changed the OrgId to ORG_ID in the seeded VO and was able to extend the VO there after.

Monday, June 4, 2012
OAF Switcher Region: How to use it?
A Switcher region can be used to dynamically switch between the items to be displayed in a table or region.
This is similar to a CASE Statement in SQL. Depending on the input to the Switcher Region, it will display the items under the region.
Lets say, we have a requirement where we need to display Delete Icon as Enabled when Employee is In-Active and Delete Icon as Disabled when Employee is Active as shown below.

To Achieve this, We need to Create a Switcher Region in the Table where you want to display the Delete Icon. If you are using an Advanced Table, Follow the below Steps.
In the VO which populates these rows, make the following changes,
In the VO which populates these rows, make the following changes,
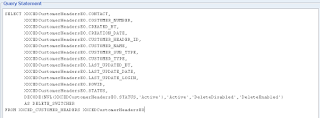
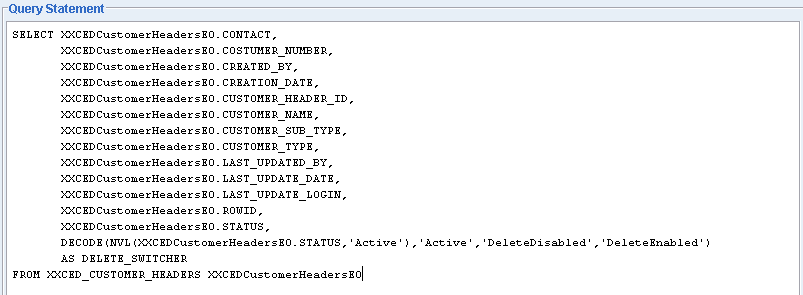
1. Create a Pseudo Column in the Query which returns "Delete_Disabled" or "Delete_Enabled" based on the Status value "Active" or "In-Active".
2. Once the SQL Statement is modified in the Query, DeleteSwitch Item is going to is going to return one the se 2 attributes as Inputs to Switcher Region ("DeleteDisabled" or "DeleteEnabled")
Now make the following changes in Page or Region
2. Once the SQL Statement is modified in the Query, DeleteSwitch Item is going to is going to return one the se 2 attributes as Inputs to Switcher Region ("DeleteDisabled" or "DeleteEnabled")
Now make the following changes in Page or Region
1. Create a New Column under Advanced Table where you want this Delete Icon to be displayed.
2. Right Click on the New Column that was created and Select New -- Switcher
2. Right Click on the New Column that was created and Select New -- Switcher
3. Set the following Properties to the Switcher Region.
ID: DeleteSwitcher
Region Style: Switcher
View Attribute: DeleteSwitcher
Region Style: Switcher
View Attribute: DeleteSwitcher
4. You will notice a new <case> item being created under the Switcher Region.
5. Set the following properties to the First Case Item.
ID: DeleteDisabled
Item Style: image
Prompt: Delete
Image URL: deleteicon_disabled.gif
Rendered: True
ID: DeleteDisabled
Item Style: image
Prompt: Delete
Image URL: deleteicon_disabled.gif
Rendered: True
6. Right Click on Switcher Region and Select New -- Case
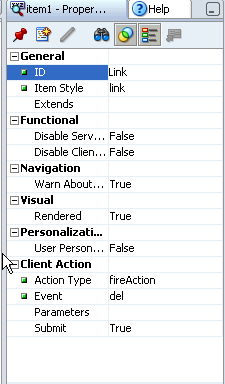
7. For the New Item, Set the following Properties
7. For the New Item, Set the following Properties
ID: DeleteEnabled
Item Style: image
Prompt: Delete
Image URL: deleteicon_enabled.gif
Rendered: True
Item Style: image
Prompt: Delete
Image URL: deleteicon_enabled.gif
Rendered: True
8. Make sure you are giving the ID of the Item exactly matching with the View Attribute value being returned by the DELETE_SWITCHER in the Sql Query of VO
9. Test run you page and you will notice that records with Status as "Active" have the Delete Icon Disabled and Status as "In-Active" have the Delete Icon Enabled.
9. Test run you page and you will notice that records with Status as "Active" have the Delete Icon Disabled and Status as "In-Active" have the Delete Icon Enabled.
OAF Error: The search cannot be executed because the table has pending changes that would be lost.

If you are getting the above error message while trying to Query a Region in OAF. Add the below simple code in the Controller of the Region/Page after you call the AMMethod.
OAF Error Message:
"The search cannot be executed because the table has pending changes that would be lost"
OAAdvancedTableBean table = (OAAdvancedTableBean) webBean.findChildRecursive ("CustomersAdvTable");
// When handling a user initiated search, we always need to execute
// the query so we pass "false" to queryData().
table.queryData(pageContext, false);
Check the below screenshot to check how I used the above code.

http://jneelmani.blogspot.com/2009/11/oaf-search-cannot-be-executed-because.html
Friday, May 25, 2012
Delete Icon Next to a Row in Advanced Table
Delete Icon will be used to delete a row in the Advanced Table. An Icon can be handled in the Table after all the columns and when Clicked upon this Icon, would delete the entire row from the Table and DB. To achieve this functionality, we need to perform the following steps.
1. Create an Advanced Table and All your Columns required in that Table.
2. To be able to display the Delete Icon at the end, Right Click on the Advanced Table --> New --> Column
3. Right Click on the New Column created and Select --> New --> Item
Set the following properties to this Item..


1. Create an Advanced Table and All your Columns required in that Table.
2. To be able to display the Delete Icon at the end, Right Click on the Advanced Table --> New --> Column
3. Right Click on the New Column created and Select --> New --> Item
Set the following properties to this Item..

4. Right Click on Column Components --> Select Sortable Header
5. Click on Sortable Header and in the Properties set the Prompt as "Delete".
Now we have the Front End Icon is ready. If you run the Page, You will be able to see the Icon in the End of the Columns of the Table. Now we need to Handle this Event in back end to delete the row next to the Delete Icon pressed.
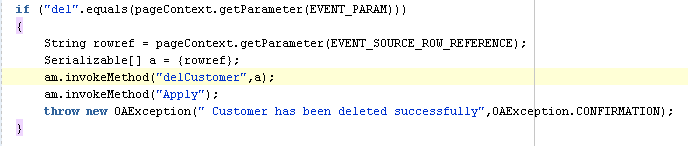
6. Write the following code in the ProcessFormRequest method of the Page Controller.
7. Include the following code in the AMImpl,java file of the Attached AM.
Rebuild the project and Run the Page. You should be able to delete the Row When Clicked on the Delete Icon next to that row.
Wednesday, February 29, 2012
How to create a poplist item in OAF
To create a poplist item, you need a VO which would display the values in the poplist. Lets say we want to display a poplist which would display the values "Yes", "No" in the poplist.


- Create a VO which would bring these values from the FND_LOOKUP_VALUES
Path: xxeee.oracle.apps.ak.test.poplist.server.EnabledFlagVO
Add this new VO to the main AM

- To use this VO, Create a new item in the Main Page with the Item Style as "MessageChoice"
- Item Id: EnabledFlag
- Select the appropriate data type
Picklist View Instance:.EnabledFlagVO1 (This is the instance which populates the values in the
poplist.
Picklist Display Attribute: Meaning (This is the attribute from Poplist VO which would display
the value in poplist
Picklist Value Attribute: Code (This is the attribute value you would like to save in the database for
for the main page)
View Instance: This is the view instance of the Main Page from poplist item is being used.
View Attribute: This is the attribute which would hold the value we chose from the poplist.


- If you want to have a blank value displayed in the poplist, Set the "Add Blank Value" in the item properties to True.
- If you want to display a specific value initially in the poplist when page is rendered.
Set that value attribute in the "Initial Value" property.

Tuesday, February 28, 2012
How to create a external Lov region for Lov Input in OAF
Lets say you want to create a Lov Input for the Item "State" which would be used to select the states in USA while entering the Address.
For this first you would need a VO which would get all the States for USA.


For this first you would need a VO which would get all the States for USA.
- Create a VO with the Select statement which gets all the USA States from the lookup
Path: xxeee.oracle.apps.ak.test.lov.server

- Create a new AM to attach the above created VO and then Attach the VO to the AM as shown below (Path: xxeee.oracle.apps.ak.test.lov.server.StatesAM)
To attach the VO to AM: Select the StatesVO on the Left Side (Available View Objects) and Click on the Arrow as show below to move it to the Data Model side. This will create a new View Instance StatesVO1 of the parent object StatesVO. From here on we will be using this new instance which is attached to the AM not the Parent VO (StatesVO).

- Now we have the VO to get the LOV Details is ready and AM to hold that VO is ready. Then we need an Independent Region which would be used to display the details for this LOV and Controller for that Region. To Create a new Region, Right Click on the Package and Select "New"
- OA Components --> Region (Path: xxeee.oracle.apps.ak.test.lov.webui)
- Give the following properties to the Header Region (Top Region)
1) Region Style: listofvalues
2) AM Definition: xxeee.oracle.apps.ak.test.lov.webui
Leave the other details to default values - Right Click on the StatesRN and Navigate New --> New Region
Assign the following properties to the New Child Region
1) ID: MainRN
2) Region Style: table
Leave all other details to default. - Right Click on the MainRN and Navigate to Create 2 new items with the following properties
Item 1:
1) ID: StateCode
2) Item Style: MessageStyledText
3) Search Allowed: True
4) Sort Allowed: True
5) Datatype: VARCHAR2
6) View Instance: StatesVO1
7) View Attribute: LookupCode
8) Prompt: State Code
Leave all other values to default.
*****************************
Item 2:
1) ID: State
2) Item Style: MessageStyledText
3) Search Allowed: False
4) Sort Allowed: True
5) Datatype: VARCHAR2
6) View Instance: StatesVO1
7) View Attribute: Meaning
8) Prompt: State
Leave all other values to default.


- Two important properties in the above Region Items
1. Search Allowed: For the Item when this Property value is set to True, In the LOV region when opened, User will be able to Search based on the Item.Let's say we have set the property to True for item "StateCode". So when the LOV Region is opened, we will be allowed to search based on the State Code as show below

Because we haven't set the Search Allowed Property to True for Item "State", it is not showing up in the Search By Poplist.
2. Sort Allowed: Sort Allowed Property will let the user sort the data by selected Column whose "Sort Allowed" property is set to True - Now our Region is Ready. Next Right Click on the Top Region and Select "Set New Controller"
Path: xxeee.oracle.apps.ak.test.lov.webui.StatesLovCO
In the ProcessRequest Method of the Controler Include the following code as shown below, So that query is executed and data is populated in the LOV Region when clicked upon.


- Create a new item in main of the page in which you want to see the LOV region.Set the item style to MessageLovInput. As soon as you change the item style, you will see a new region under the Lov item. Also you will find a lovMappings item created along with the region.You can delete the new region created by Lov as we would be using the External Region to display Lov values.
Set the following properties as shown below for the Lov Item.

- To use the External Lov region populate the External Lov field with the Region that was created previously (Complete Path). Set the Sort Allowed propety to "No"
- Click on the lovMap1 created under LovMappings. Set the appropriate id for the lovMap1.
Following properties are important for this lov to work.
LovRegionItem: This is the value that you want to store in the database or use from the Lov region.
ReturnItem: Give the Item ID from the current region where you want to have the value from the
Lov stored.
CriteriaItem: Give the same value as ReturnItem.

- Rebuild the page and run the page to have the Lov displayed next to the "State" Item in the page

Subscribe to:
Posts (Atom)