Delete Icon will be used to delete a row in the Advanced Table. An Icon can be handled in the Table after all the columns and when Clicked upon this Icon, would delete the entire row from the Table and DB. To achieve this functionality, we need to perform the following steps.
1. Create an Advanced Table and All your Columns required in that Table.
2. To be able to display the Delete Icon at the end, Right Click on the Advanced Table --> New --> Column
3. Right Click on the New Column created and Select --> New --> Item
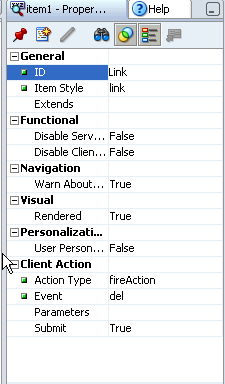
Set the following properties to this Item..


1. Create an Advanced Table and All your Columns required in that Table.
2. To be able to display the Delete Icon at the end, Right Click on the Advanced Table --> New --> Column
3. Right Click on the New Column created and Select --> New --> Item
Set the following properties to this Item..

4. Right Click on Column Components --> Select Sortable Header
5. Click on Sortable Header and in the Properties set the Prompt as "Delete".
Now we have the Front End Icon is ready. If you run the Page, You will be able to see the Icon in the End of the Columns of the Table. Now we need to Handle this Event in back end to delete the row next to the Delete Icon pressed.
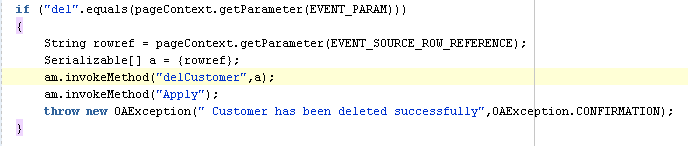
6. Write the following code in the ProcessFormRequest method of the Page Controller.
7. Include the following code in the AMImpl,java file of the Attached AM.
Rebuild the project and Run the Page. You should be able to delete the Row When Clicked on the Delete Icon next to that row.
Great content thank you for sharing useful content from erptree
ReplyDelete