A Purchase Requisition is a method by which Goods/Services can be Purchased from a Supplier. In Oracle a Purchase Requisition is routed for Approval using Workflow engine. Once approved, this Requisition is often converted to RFQ (Request for Quotation). A Purchase Requisition is usually generated by User Departement or the personnel who are actually going to use the goods or services received from the Requisition.
Tuesday, June 12, 2012
Monday, June 4, 2012
OAF Switcher Region: How to use it?
A Switcher region can be used to dynamically switch between the items to be displayed in a table or region.
This is similar to a CASE Statement in SQL. Depending on the input to the Switcher Region, it will display the items under the region.
Lets say, we have a requirement where we need to display Delete Icon as Enabled when Employee is In-Active and Delete Icon as Disabled when Employee is Active as shown below.

To Achieve this, We need to Create a Switcher Region in the Table where you want to display the Delete Icon. If you are using an Advanced Table, Follow the below Steps.
In the VO which populates these rows, make the following changes,
In the VO which populates these rows, make the following changes,
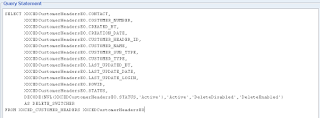
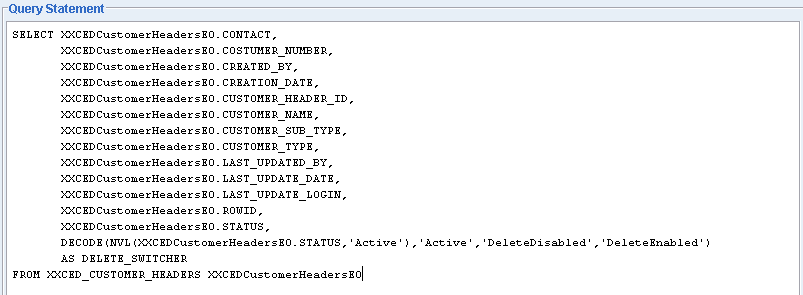
1. Create a Pseudo Column in the Query which returns "Delete_Disabled" or "Delete_Enabled" based on the Status value "Active" or "In-Active".
2. Once the SQL Statement is modified in the Query, DeleteSwitch Item is going to is going to return one the se 2 attributes as Inputs to Switcher Region ("DeleteDisabled" or "DeleteEnabled")
Now make the following changes in Page or Region
2. Once the SQL Statement is modified in the Query, DeleteSwitch Item is going to is going to return one the se 2 attributes as Inputs to Switcher Region ("DeleteDisabled" or "DeleteEnabled")
Now make the following changes in Page or Region
1. Create a New Column under Advanced Table where you want this Delete Icon to be displayed.
2. Right Click on the New Column that was created and Select New -- Switcher
2. Right Click on the New Column that was created and Select New -- Switcher
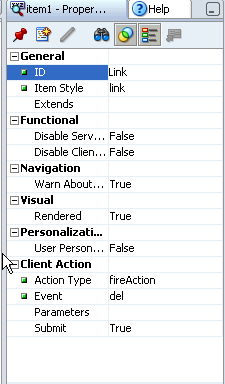
3. Set the following Properties to the Switcher Region.
ID: DeleteSwitcher
Region Style: Switcher
View Attribute: DeleteSwitcher
Region Style: Switcher
View Attribute: DeleteSwitcher
4. You will notice a new <case> item being created under the Switcher Region.
5. Set the following properties to the First Case Item.
ID: DeleteDisabled
Item Style: image
Prompt: Delete
Image URL: deleteicon_disabled.gif
Rendered: True
ID: DeleteDisabled
Item Style: image
Prompt: Delete
Image URL: deleteicon_disabled.gif
Rendered: True
6. Right Click on Switcher Region and Select New -- Case
7. For the New Item, Set the following Properties
7. For the New Item, Set the following Properties
ID: DeleteEnabled
Item Style: image
Prompt: Delete
Image URL: deleteicon_enabled.gif
Rendered: True
Item Style: image
Prompt: Delete
Image URL: deleteicon_enabled.gif
Rendered: True
8. Make sure you are giving the ID of the Item exactly matching with the View Attribute value being returned by the DELETE_SWITCHER in the Sql Query of VO
9. Test run you page and you will notice that records with Status as "Active" have the Delete Icon Disabled and Status as "In-Active" have the Delete Icon Enabled.
9. Test run you page and you will notice that records with Status as "Active" have the Delete Icon Disabled and Status as "In-Active" have the Delete Icon Enabled.
OAF Error: The search cannot be executed because the table has pending changes that would be lost.

If you are getting the above error message while trying to Query a Region in OAF. Add the below simple code in the Controller of the Region/Page after you call the AMMethod.
OAF Error Message:
"The search cannot be executed because the table has pending changes that would be lost"
OAAdvancedTableBean table = (OAAdvancedTableBean) webBean.findChildRecursive ("CustomersAdvTable");
// When handling a user initiated search, we always need to execute
// the query so we pass "false" to queryData().
table.queryData(pageContext, false);
Check the below screenshot to check how I used the above code.

http://jneelmani.blogspot.com/2009/11/oaf-search-cannot-be-executed-because.html
Monday, May 28, 2012
How to create a Result Type in a Notification
To display a new Result Type in the notification we need to create a new Lookup Type in the workflow builder and Lookup Codes that you want to display in the notifications.
Steps to Create a New Lookup Type and Assign it to a Notification
1. Right Click on Lookup Types -- Select New


4. Enter the following Properties for the New Lookup Code and Click Apply and OK


Steps to Create a New Lookup Type and Assign it to a Notification
1. Right Click on Lookup Types -- Select New

2.
New Lookup Type will be displayed under the Lookup Types
3.
Right Click on the New BPA Approval Lookup that we created and Select “New
Lookup Code”
4. Enter the following Properties for the New Lookup Code and Click Apply and OK

5.
Create a new Lookup Code for “Reject” similarly as did for “Approve”
6.
To be able to see these Lookup Codes as buttons in the Approval Notification, Create
a New Message with the Result Type as BPA Approval Lookup
7. Create a new Message and in the Result Tab, Enter the following Properties as shown below.
7. Create a new Message and in the Result Tab, Enter the following Properties as shown below.


8.
Click Apply and OK.
9.
Now assign this Message and Result Type to the Notification where you want to
have this Results Displayed as Buttons inside the Notification

10.
Include this Notification in your Process and when Run, you would be able to
see the selected Resulted type of Buttons in the Notification
Friday, May 25, 2012
Delete Icon Next to a Row in Advanced Table
Delete Icon will be used to delete a row in the Advanced Table. An Icon can be handled in the Table after all the columns and when Clicked upon this Icon, would delete the entire row from the Table and DB. To achieve this functionality, we need to perform the following steps.
1. Create an Advanced Table and All your Columns required in that Table.
2. To be able to display the Delete Icon at the end, Right Click on the Advanced Table --> New --> Column
3. Right Click on the New Column created and Select --> New --> Item
Set the following properties to this Item..


1. Create an Advanced Table and All your Columns required in that Table.
2. To be able to display the Delete Icon at the end, Right Click on the Advanced Table --> New --> Column
3. Right Click on the New Column created and Select --> New --> Item
Set the following properties to this Item..

4. Right Click on Column Components --> Select Sortable Header
5. Click on Sortable Header and in the Properties set the Prompt as "Delete".
Now we have the Front End Icon is ready. If you run the Page, You will be able to see the Icon in the End of the Columns of the Table. Now we need to Handle this Event in back end to delete the row next to the Delete Icon pressed.
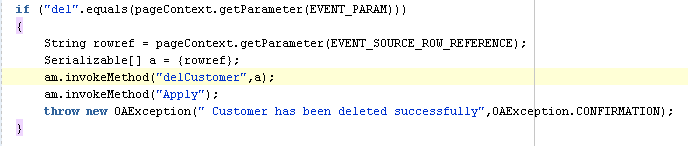
6. Write the following code in the ProcessFormRequest method of the Page Controller.
7. Include the following code in the AMImpl,java file of the Attached AM.
Rebuild the project and Run the Page. You should be able to delete the Row When Clicked on the Delete Icon next to that row.
Subscribe to:
Posts (Atom)